

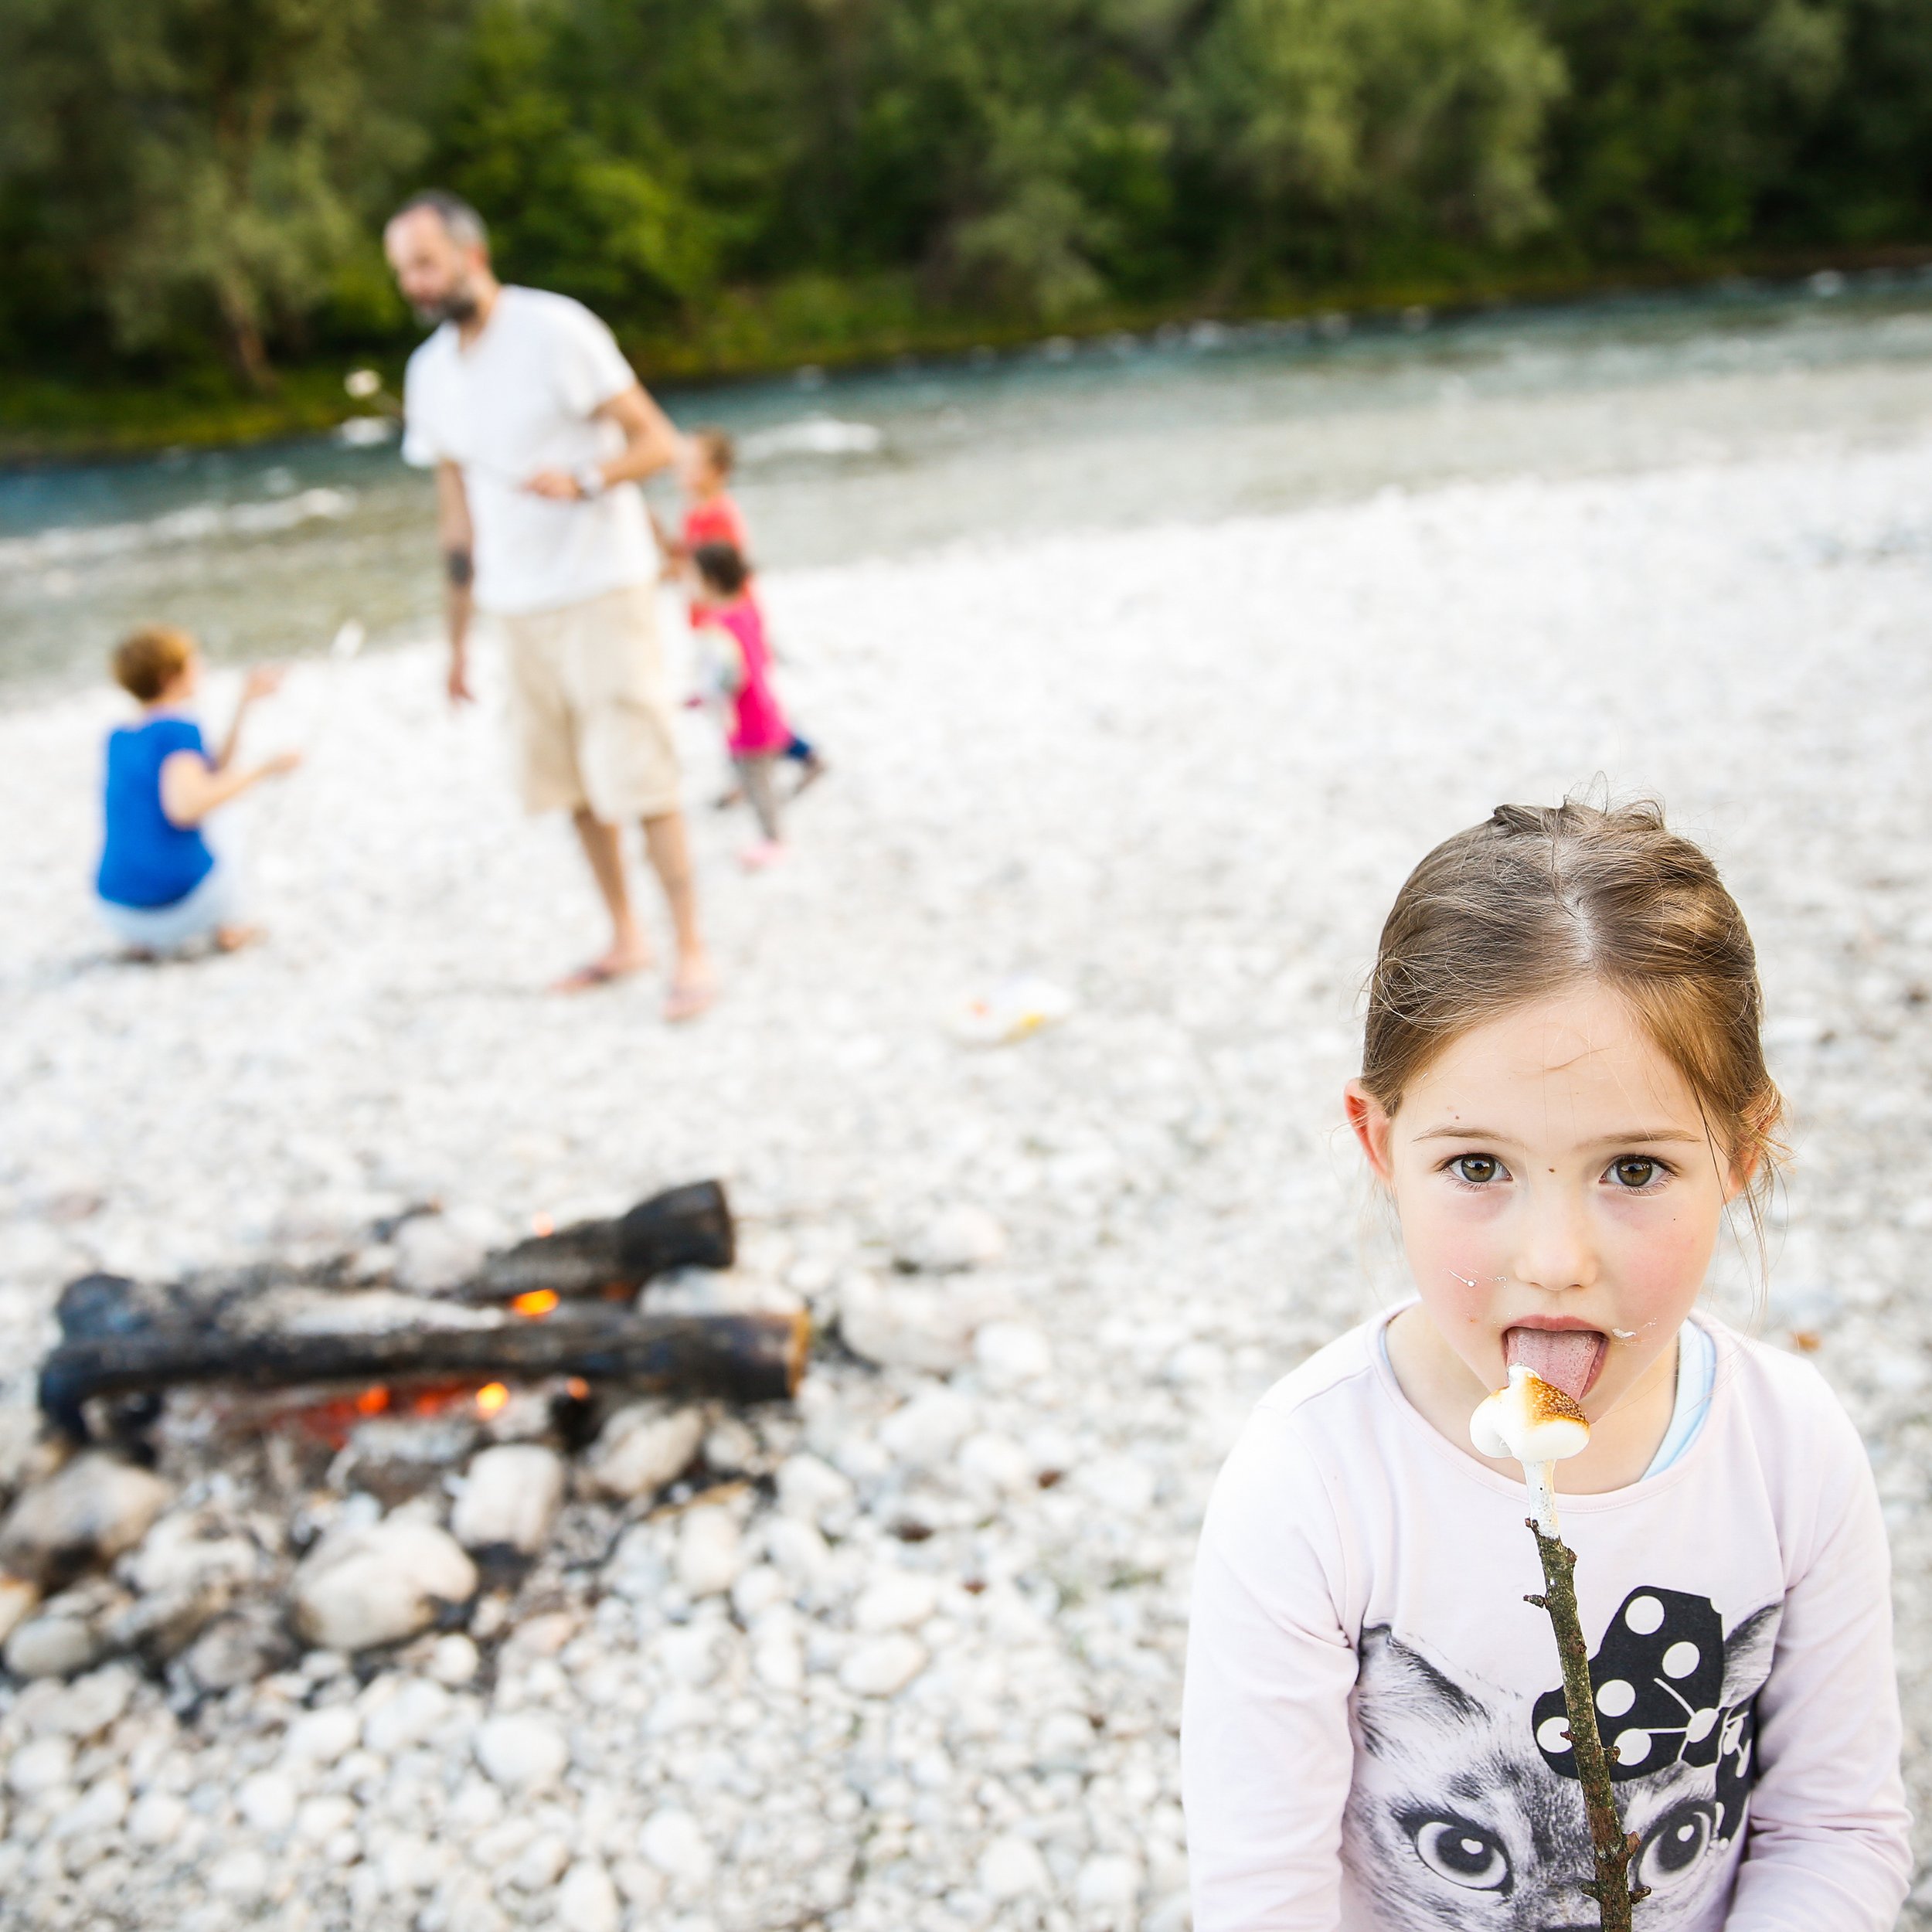
Camp Like a Homeschooler
Don't forget to pack your spirit of adventure and make this year's family vacation one to remember.

“Nature time is one of the best parts of homeschooling,” says homeschool dad Joel Tiegs, who, with his wife Anna, homeschools their three children. “And it’s surprising that it took us so long to make camping a part of that because it’s so obvious that weekend camping is the ultimate nature study.”
The Tiegs family had never been camping before their first family expedition, and “there was definitely a learning curve,” says Anna. “Do not make our mistake and go all-in on your first camping trip. Start with an overnight and work your way up.” Ultimately, though, camping felt like a happy extension of the Tiegs’ homeschool life, and now loading up the car for a camping adventure happens about once a month.
We all know the benefits of outdoor time — reduced stress, improved creativity, deeper connections to the natural world, affordability — and even if you’ve never pitched a tent, you can put together a fun family camping trip that just may inspire you, like the Tiegs clan, to make camping part of your homeschool life. We’ve got everything you need to know to plan that first family camping trip right here.
The Organized Adventure
We’re lucky in the United States, where a road trip can take your campout to mountain peaks and desert valleys, to natural wonders and woodland lakes. How do you choose the perfect spot for your family camping trip? These tips should help you narrow it down.
Keep it within easy driving distance.
Eventually, you may want to venture far and wide, but if you’re newbie campers, stick with campsites within a two-hour radius of your home base. Not only does this make a short drive to your destination, which means no car-lag to deal with when you arrive or worries about getting set up before dark if you hit traffic along the way, says Jen Aist, author of Babes in the Woods: Hiking, Camping, and Boating With Babies and Young Children. Keeping it close to home also takes away that panicked what-if-everything-goes-wrong feeling. “If everything goes wrong, you’ll load up the car, drive home, and try another time,” Aist says.
Stick with state and national parks.
If you’re new to camping, you will want decent bathroom facilities. Trust us: Helping your 9-year-old eliminate in the dark woods with nothing but a headlamp and a roll of toilet paper is not how you want to spend your first camping trip. Most state and national parks have restrooms, often with showers, and other amenities like on-site firewood bundles, running water, and even small supply stores. Check the park’s website (and Yelp reviews) to see what kind of facilities are available to campers.
Do advance reconnaissance.
Unless you’re an experienced naturalist, identifying new-to-you birds, bugs, trees, and wildflowers on the spot can be tricky. Prepare for your campout by spending some time getting familiar with your campsite’s local flora and fauna so that you’ll be able to identify it when you see it. You may still fumble for some identifications, but it’s amazing how much more competent you’ll feel knowing you can probably recognize a few local nature highlights.
Pick two activities.
On an overnight campout, you can reasonably fit in two nature activities: a longer activity the day you arrive and a shorter activity to enjoy between breakfast and packing the next day. The park website is a good place to start — most parks list on-site recreational activities as well as nearby ones. If you’re trying something brand-spanking new that none of you has done before — say, your first family canoe trip — do yourself a favor and look for a guide or beginner’s program that can walk you through the basics. There’s no one-size-fits-all approach to choosing campout activities, but including one tried-and-true activity you know your family enjoys and one activity that’s new to some or all of you can be a good plan, says Meri-Margaret Deoudes, spokesperson for the National Wildlife federations's Be Out There initiative, which encourages kids to get outside. (Plan your new adventure for your shorter, morning activity.)
Always Safety First
Camping is an adventure — and while it’s usually perfectly safe, there are a few things you can do to make sure your crew comes back from campouts healthy and happy. When you check into your campsite, be sure to ask for directions to the nearest emergency care facility and the best way to handle after-hours emergencies. You’ll probably never need to use this information, but it’s good to have.
You know to bring a first-aid kid, but don’t forget to add items for your family’s specific needs, such as prescription medications or kid-safe pain reliever and allergy medicine, recommends Anna Tiegs. “On our first camping trip, I forgot my contact lens solution and had to spend most of the trip viewing the world through my near-sighted eyes,” Anna says. “General checklists are great, but everybody has specific things they need to function every day. Make sure you’ve included yours in your kit.”
Set ground rules for safe camping: Everyone needs a buddy, even if you’re only venturing as far as the bathroom, and no one’s allowed beyond a certain visual perimeter. (Big trees, fallen logs, flowering plants, and other clearly obvious natural objects make easy-to-define boundaries.) “After our son Rowan wandered a little too far and scared us all to death, we started tying red bandanas around tree branches to mark the roam-free boundary of our campsite,” says Joel Tiegs.
Encourage kids to talk and sing if you’re hiking or exploring — if critters can hear you coming, they’re likely to hide before you get there, but accidentally sneaking up on wildlife can kick their defenses into action, says Randy Johnson, author of Best Easy Day Hikes: Great Smoky Mountains National Park.
Clean up thoroughly after every meal, and keep your food stored out of sight in your car. (If you’re in a car without a closed trunk, cover food with a blanket or towel so curious — and smart — creatures like bears don’t spot it.) Never bring food into your tent. People think of bears breaking into tents for food, but skunks, raccoon, snakes, and other wildlife are just as likely to be drawn to the smells of food.
Check your kids (and yourself ) thoroughly for ticks periodically during your camping trip to follow the Centers for Disease Control and Prevention’s guidelines for outdoor safety. Be sure to check sensitive areas, including the scalp, groin, armpits, and belly button. In addition to sunscreen, use a child-safe bug and tick repellent containing 20 to 39 percent DEET, and spray it on clothes as well as on your exposed skin. Tucking in shirts and pants (into socks or boots) can also help reduce your risk when walking through woods or un-mowed grass.
Teach kids to avoid poison ivy, oak, and sumac with the handy memory aid “Leaves of three, leave it be.” What if you do come into contact with poison ivy? Get kids to quickly soap up in the shower — baths can cause irritation to spread — and apply calamine lotion from your first-aid kit to the affected area.
Take it in Stages
If you want camping to be a great experience, don’t head straight for the woods. Instead, follow this three-step plan to help you get the hang of everything before you tackle your first official wilderness adventure.
The Backyard Campout
Give your equipment an official test drive in a no-stress spot: Set up (and take down!) your tent, build a small campfire, boil water for hot chocolate, and have a sleepover in your new sleeping bags right in your own backyard. This is smart for a couple of reasons, says Jen Aist. You’ll get comfortable with your equipment, you can pop inside for anything you forgot (and make a note that you don’t want to forget it when you’re actually camping out), and it lets kids acclimate to outdoor noises and darkness.
The Weekender
Once you’ve got a backyard campout under your belt, book a Saturday night campsite at a nearby state or national park. Ideally, you won’t need to drive more than an hour to get to a campsite with real bathrooms, fire rings, and a friendly visitor center. Arrive early on Saturday, get set up first thing, and head home after lunch on Sunday. “Think of it as camping-lite,” says Aist. “All the fun but none of the stress.”
The Real Deal
Now that you’re ready for multi-night campouts, let your spirit of adventure lead you. It’s still smart to gradually work up to bigger experiences, like thru-hiking and camping out along the way or week-long camping expeditions, but now you’re ready for whatever Mother Nature throws at you.
What Gear Do You Really Need?
Newbie campers do not need a lot of fancy gear to have a great campout. In fact, first-time campers should check with your state parks department to see if they offer loaner equipment for new campers — in Georgia, for instance, you can borrow a tent and sleeping pads and ask a ranger to help you set things up and get your campfire started on your first trip. If you have friends who camp often, you may be able to borrow basics from them.
Sleeping bag. If you’re going on a summer camping trip, any sleeping bag you already have will be just fine. If you don’t have a bag, don’t spend a lot of money: Look for one with a man-made filler (it’s cheaper and can handle getting wet better than fancier down versions) and keep in mind that the temperature rating is a bag’s absolute minimum viable temperature, so add 10 degrees to figure out comfortable sleeping temperature.
Sleeping pad. This is the one thing you should probably go ahead and splurge on — which is okay, since a splurge-worthy inflatable pad should cost less than $100. The sleeping pad goes under your bag, between you and the ground, and a good one makes the difference between waking up ready to play in the woods and staying awake all night finding new places to ache.
Tent. If you can’t borrow a tent, buy a lightweight, dome-style tent with flexible poles that sleeps one person more than you need. Tent person-sizes represent the maximum number of people who can fit comfortably into the tent, but if you want to avoid feeling cramped, buy a tent with a little extra room to spread out.
Floor tarp. Buy a sheet of thick, sturdy plastic, and cut a piece slightly larger than the floor of your tent. You’ll pitch your tent on top of this, and it will protect your tent floor from getting torn by debris on the ground. You can buy fancy versions from sports stores, but plain plastic works just fine.
Headlamp. The kids will want flashlights, but make sure you have a couple of cheap LED headlamps so that you can see hands-free for bathroom trips after dark.
Lantern. Nighttime in the woods can surprise you with how dark it actually is. A couple of inexpensive LED lanterns will give you light to cook and see by after the sun goes down.
Campfire Cooking
Cooking over a campfire can be a fun adventure —“it’s like we’re living in Little House on the Prairie” — or a giant pain, depending on how much you enjoy cooking outdoors. We’ve got a few ideas for your campsite cookout — from a super-simple plan that requires nothing more than a little prep work and strategic packing to practically dinner party- worthy recipes that you’ll want to pat yourself on the back for pulling off. Mix and match to come up with your family’s perfect combination of simple and delicious.
The easiest options. All you’ll need to pull off these simple meals is a kettle you can use to boil water over your campfire and a long cooking fork. For lunch when you arrive, prep and pack sandwiches in a cooler or insulated bag. For dinner, cook your favorite hot dogs over the campfire — make sure your cooking forks are long enough so that you can stand a safe distance from the flames. Bring pre-chopped veggies, buns, and condiments in your cooler. For breakfast, use your kettle to boil water to pour over instant oatmeal — pre-measure portions of oatmeal with toppings. You’ll need to bring bowls, plates, and spoons (disposable if you want to keep things simple). You can also use your kettle to make coffee and hot chocolate — you’ll need mugs or insulated cups if you plan to do that.
Breakfast. With a frying pan and a simple cooking grid (basically a metal shelf that acts like a stovetop), it’s not complicated to make eggs and bacon. (Pack ingredients that need to stay cold in your cooler.) You can also thread bacon on a cooking fork, accordion-style, and cook it just as you would a hot dog. If you’re feeling more ambitious, use your frying pan to make a Dutch Baby Pancake, a big, puffed, cake-like pancake that you slice and serve.
Lunch. If you’re aiming for a hot lunch, pack your favorite meats, cheeses, and veggies and a big loaf of French bread. Slice the bread, leaving about 1/4-inch at the bottom of each loaf so that the bread stays together. Spread each slice with butter and mustard and your fixings of choice (you can do all this at home and pack it in your cooler), wrap in foil, and cook over the fire for 15 to 20 minutes, turning frequently.
Dinner. One of the easiest dinners is your favorite chili or stew — made and frozen at home and heated in a Dutch oven over your campfire. If you want to cook something more substantial on site, foil packets of meat, chicken, or fish and vegetables are easy and yummy — just nestle them in the fire and use heat-proof gloves to pull them out when they’re ready. (You can even make a pasta version with goat cheese and tomatoes.)
Dessert. S’mores are classic: Roast a marshmallow to golden brown, and sandwich is with a square of chocolate between two graham crackers. You can vary this by slicing a banana down the middle, stuffing it with mini marshmallows and chocolate chips, wrapping in foil, and cooking it on the fire for about 10 minutes.
First-Time Campout Schedule
Need help figuring what to actually, you know, do on your first camping trip? Here’s a simple schedule for a one-night camp:
Day 1: Morning
Load the car and head off to your already reserved campsite. Plan to arrive around 2 P.M.
Day 1: Afternoon
Set up your tent and campsite as soon as you arrive.
Explore the area around your campsite and define your roam-free boundaries together.
Engage in planned outdoor activity — hiking, canoeing, biking, etc.
Day 1: Evening
Start your fire for dinner around 7 P.M.
Cook, eat, sing, read, stargaze, etc., until bedtime
Day 2: Morning
Plan on everyone waking early and wanting breakfast by about 8 A.M.
Engage in planned morning activity—hiking, canoeing, biking, etc.
Day 2: Afternoon
Be back at your campsite about two hours before checkout time. (After a few trips, you can trim this down to one hour.)
Load up your gear, and head home.
Fun Things to Do on Your Camping Adventure
“Something magical happens when you are outside that doesn’t happen any other place,” says Aist, and a family camping trip is the perfect time to make a little outside magic. If you’re new to camping and nature study, you may need to take a more active role in helping your crew explore the natural world around them. If that’s the case, don’t worry — after a few trips, or even just a few hours, your kids will be playing outside like pros.
Set a collaborative camp scavenger hunt.
Before your trip, come up with a list of nature discoveries you’re likely to make at your campsite. Mix in easy-to-find items (a pinecone, a wildflower, a stick you could use to make a slingshot) with more specific items (a robin, a loblolly pine tree, a bird’s nest). If you like, give everyone an inexpensive camera to record their finds and compile them into a camping discoveries photo book when you get home, or keep a family nature journal as a record of your trip. As time goes by, your scavenger hunts can get increasingly sophisticated.
Set aside free time to just play.
And don’t expect kids to run off and play when you’re doing something cool, like building a fire or setting up the tent — they’ll want to participate in those activities, too, at least the first few times. Instead, set aside time for everyone, including you, to ramble, roam, and explore. Climb trees, look for fish in brook, follow the sound of a waterfall, try to discover the source of that sweet, floral smell. The more you’re willing to demonstrate how fun nature exploration can be, the more likely your kids are to follow suit.
Take advantage of your surroundings.
Parks often have cool natural features to explore, so get familiar with your destination so that you can pack accordingly. If there’s a lake, swimming hole, or lots of brooks and waterfalls, bring your swimsuits. If the park is crisscrossed with cool hiking trails, you’ll want to pack trail packs and hiking shoes. If the park has a croquet lawn or shuffleboard or some other set-up, file that away in your brain as an option in case something else doesn’t go as planned.
Don’t be afraid to do nothing.
Sometimes, it’s perfectly fine to let kids be bored and figure out how to stop being bored on their own. Resist the urge to schedule every minute or jump in with a solution when your kids complain of boredom.
Have night-time activities planned.
Everyone will be tired after a day of active play, but don’t be surprised if the kids are too hyped up to easily fall asleep. Plan evening as a wind-down process: Start slowing things down after dinner by singing and stargazing around the campfire. Read a book or listen to an audiobook. Alternatively, you may want to play cards or a board game by lantern light and save the reading until everyone is snuggled up in her own sleeping bag. Gradually slow down the tempo of your activities until everyone’s ready to go to sleep.
What If It Rains?
Plan your trip with an eye on the weather, but if the forecast isn’t your friend, don’t assume the campout is over. Here’s how to love a rainy campout.
Play in the rain.
In summer, when it’s raining but not storming, a rainy day hike can be refreshing, taking the edge off the heat, and it’s fascinating to watch the nature around you change in wet weather. Put on your rain gear and shoes that can handle a little mud, and continue with business as usual.
Be prepared.
Toss a couple of things into your pack that will liven up an afternoon in the tent — we like our plastic card deck (it can handle a little moisture), a fast-paced but strategic board game (that doesn’t use a lot of pieces), and a couple of ready-to-play audiobooks.
Relocate hanging out and cooking to a covered area.
Bigger campgrounds often have covered cooking and recreation areas, but you can also strategically drape tarps to create dry spot.
If the weather is stormy (with thunder and lightning or tornado watches on the radar) or if you’re genuinely miserable, pack up and go home. Your camping trip should be a fun adventure; it’s totally OK to call it quits if you stop having a good time.
(We’re Amazon affiliates, so if you purchase something through an Amazon link, we may receive a small percentage of the sale. Obviously this doesn’t influence what we recommend, and we link to places other than Amazon.) This was originally published in the summer 2017 issue of HSL.


Inspired to try a family campout? Yes, you need the sleeping bag and that cooking fork, but we all know the really essential item is the book you bring as your family camping readaloud. Any book makes a good camping trip story, but we especially like books that tie into outdoor adventure.